News

PTC’s technology plays key role in Nuclear Fusion breakthrough

One of the UK’s leading digital transformation experts has played a key role in the recent Nuclear Fusion reaction breakthrough that generated more energy than it consumed.

PTC, which has its technical and sales office in Reading, has announced that its Creo computer-aided design (CAD) and Windchill product lifecycle management (PLM) technology was used by Lawrence Livermore National Laboratory (LLNL) throughout the development of the National Ignition Facility (NIF).

With more than 3.5 million components, comprising 750,000 unique part designs, the highly engineered NIF “system of systems” machine is believed to be the largest Creo and Windchill assembly ever created and perhaps the largest assembly ever modelled in 3D CAD.

“The NIF represents an incredible feat of engineering, whose breakthrough could ultimately transform access to clean energy,” said Jim Heppelmann, President and CEO of PTC.

“We are thankful for the collaborative relationship we have enjoyed over the years with LLNL and the United States Department of Energy (DOE) more broadly. The use of PTC software solutions throughout the project’s development demonstrates the tremendous power of our technology.”

PTC has been supporting the NIF engineering team at Lawrence Livermore National Laboratory as a close partner for over 25 years, starting with its Pro/ENGINEER CAD software (now known as Creo) and then adding Windchill to the solution as its data management needs grew and grew.

Over the years, the company’s product teams have had many collaborative discussions with the LLNL and broader DOE representatives, who have always challenged it to push the envelope for what its software must do in the advanced projects it is used in.

This included major advancements in 3D visualisation technology that have subsequently gone on to be incorporated into the wider PTC suite of solutions.

Jim concluded: “Our goal is to enable our customers to make their existing products more sustainable and, of course, to enable them to design and manufacture new innovations that drive the clean energy revolution, ranging from solar panels to the National Ignition Facility.”

Climate targets validated by Science Based Targets initiative

The Science Based Targets initiative (SBTi) has validated the Schaeffler Group’s targets for reducing greenhouse gas emissions as being in conformity with SBTi criteria and recommendations and hence in line with what the latest climate science considers necessary in order to meet the goals of the Paris Agreement. The global automotive and industrial supplier is committed to cutting its absolute Scope 1 and Scope 2 greenhouse gas emissions by 90 per cent by 2030, with 2019 as its base year. The company has also set itself the target of reducing its absolute Scope 3 greenhouse gas emissions from purchased goods and services, fuel- and energy-related activities, and upstream transportation and distribution by 25 per cent over the same period.

Science-based climate targets

The SBTi target validation team has classified and assessed the climate targets submitted to it by the Schaeffler Group – and has concluded that they are in line with the targets of the Paris Agreement and therefore support the overarching goal of limiting global warming to 1.5 degree above pre-industrial levels. “Limiting climate warming is a global task that can be accomplished only by working together,” says Schaeffler CEO Klaus Rosenfeld. “We have consciously taken a science-based approach to our climate targets and are delighted at this recognition from the SBTi. In pursuing our Roadmap 2025 and our ambitious targets we are taking a path that, although challenging, is nevertheless absolutely vital.”

Clearly defined pathway for reducing greenhouse gas emissions

The Schaeffler Group’s climate targets are science-based, as confirmed by the SBTi, and therefore provide a clearly defined pathway for reducing greenhouse gas emissions. Schaeffler has adopted these targets because it wants to prevent the worst effects of climate change and to futureproof business growth. The validation by the SBTi confirms that the Schaeffler Group’s targets and measures accord with the latest climate science, meaning they are fit for purpose in terms of achieving the goals of the Paris Agreement. Science-based climate targets also futureproof business growth and drive innovation and competitiveness. Consequently, validation by the SBTi boosts investor confidence and builds trust with customers.

The SBTi is a partnership between CDP, the United Nations Global Compact, World Resources Institute (WRI), and the World Wide Fund for Nature (WWF). It was established in 2015 to help companies set emissions reduction targets that are in line with climate science and the goals of the Paris Agreement.

SBTi’s validation information will be posted on the SBTi website.

Full details of the Schaeffler Group’s commitment to sustainability are available in its latest sustainability report:

www.schaeffler-sustainability-report.com/2021

IET announces new Chief Executive and Secretary

Ed Almond has been announced as the new Chief Executive and Secretary (CES) of the Institution of Engineering and Technology (IET).

Ed has worked at the IET for 21 years, having held the position of Director of Finance since 2006 and becoming interim CES last summer following Nigel Fine’s retirement. Ed is an IET Fellow and takes on the IET as a world-leading membership and learned society, driving forward its charitable purpose to engineer a better world and growing a worldwide membership of 155,000 people across 148 countries.

On his appointment, Ed said: “It is a tremendous pleasure for me to take on this role to lead the IET – it is a fantastic organisation and as a diverse home for engineering and technology, I know the importance of sharing our knowledge to help make better sense of the world and solve the challenges that matter.

“I’m really looking forward to continuing to work with our diverse network of members, volunteers and colleagues, building on our many achievements and further establishing the IET as a leading voice within the engineering and technology community and to wider society. 

“My focus for this year includes driving forward our influence, knowledge and expertise to show the role that engineering and technology plays in the future of our society and planet, specifically in solving societal challenges.”  

IET President, Professor Bob Cryan CBE, added: “Over the past nine months the IET has run an extensive and inclusive recruitment search, using executive search companies to find a CES that will lead us into our next chapter following Nigel Fine’s retirement last summer.

“Following this process, I’m delighted to announce that Ed has been successful in the permanent appointment as CES with immediate effect.

“Alongside his extensive knowledge of the workings of the IET, Ed is truly passionate about our purpose. I very much look forward to continuing to work closely with him and the IET team over my remaining term in office to drive our ambitions forward as we continue to work to engineer a better world.”

The IET is a world leading professional membership organisation aiming to inspire, inform and influence the global engineering and technology community, as well as wider society. It supports and develops engineers throughout all stages of their career, aims to influence industry to embed engineering excellence and professionalism into everything they do and works to inspire the next generation of engineers. To find out more, please visit www.theiet.org/about.

Dimensionics chooses 2D/3D laser profile scanners from Micro-Epsilon to check dimensional accuracy of sheet metal at high speed

Dimensionics, a supplier of measuring and testing technology, has chosen 2D/3D laser profile scanners from Micro-Epsilon for use on its Disionic Sheet Control measuring table, a fully automatic system for testing the dimensional accuracy of sheet metal.

The Disionic Sheet Control measuring table is equipped with two scanCONTROL 3000-25/BL laser profile scanners from Micro-Epsilon. The scanners, which have a compact design with integral controller, measure sheet metal blanks and check these for width, length, angle, straightness, deflection (convex/concave) and the planarity of the sheet metal edges.

Blue laser technology

The two laser profile scanners are mounted on the XY table. Each scanner has a measuring range of 25mm and is guided over two edges in the X and Y direction of the sheets. The sensors use Blue Laser technology to ensures they achieve maximum precision and reliable results on demanding surfaces such as shiny metallic sheet.

Measurement and data output for the entire test process take just a few seconds. The laser profile scanners transmit the measurement data via Gigabit Ethernet to the extensive system software for analysis. Based on the data, any production errors such as inaccurate edges or dimensional deviations due to inaccurate positioning can be detected. As a result, the production quality of the sheet metal blanks is checked in a traceable and reliable manner. In this way, the laser profile scanners, together with the Disionic Sheet Control measuring table, ensure an automated testing process that was previously a laborious manual process.

Mathias Evers, Application Engineer at Dimensionics comments: “Both the versatility and reliable operation of the Micro-Epsilon sensors are impressive. We have already been won over by the product quality in numerous projects and will also count on Micro-Epsilon in future tasks.” 

The scanCONTROL 30×0 series is among the highest performing profile sensors in terms of their size, accuracy and measuring rate. They provide calibrated 2D profile data with up to 7.37 million points per second. A profile frequency of up to 10kHz enables precise profile measurements in dynamic high speed processes. The high resolution sensor matrix offers a resolution of 2,048 points with an ultimate point distance of just 12µm, enabling extremely fine details to be detected reliably. The sensors are available with either blue or red laser diodes.

Start one step at a time

The rise of connected industrial technologies and Industry 4.0 has prompted the development and launch of countless systems with extensive capabilities and functions. This is often beneficial for businesses with a defined and set long-term strategy, but it can lead to forcing early adoption and spending when deployments and licensing outstrip a company’s capacity to change work processes ad adopt new tech. Here, Sean Robinson, software solutions manager at Novotek UK and Ireland, explains how less can be more with new plant tech deployments – and why immediate problem-solving needs to be a distinct effort within longer-term strategies.

Countless proverbs, maxims and quotes have been formed around the idea of moderation, dating back as far as – or even further than – Ancient Greek society. The notion remains important to this day for everything from diet to technology. However, engineers and plant managers frequently over-indulge in the latter and over-specify systems that offer functionality well beyond what is necessary or even practically useful.

It can initially appear that there is no harm in opting for an automation or plant IT system that has extensive functionality, because this may help to solve future problems as they arise. That being said, an investment, positioned to be all-encompassing, like a full,  manufacturing execution system (MES) can sometimes present its own barriers to adoption for certain businesses, especially those in sectors that favour flexibility, such as fast-moving consumer goods (FMCG) or food manufacturing.

Where core production processes and related enabling technology are well-established, it can be risky, expensive and overkill to treat the need to implement specific new capabilities as the trigger for wholesale replacement or re-working. The key is to identify where critical new functional needs can be implemented around the installed technology base in focused ways that deliver results, while leaving open the option of incrementally adding functionally-focused solutions in a staged way, over time. At Novotek, our role is to help our customers choose technology that delivers on an immediate need, while opening up the potential to build incrementally in a controlled, low-risk way.

Fortunately, both the licensing models and the technical architectures of plant IT solutions are changing in ways that support this kind of approach. So, the software cost and deployment services costs of bringing on board very specific capabilities can be scaled to match the user base, and the technical and functional boundaries of a specific need. We can think of these focused deployments as “micro-apps”. A key part of this approach is that the apps aren’t built as bespoke, or as an extension of a legacy (and possibly obsolete) system. It’s a productised solution – with only the “right” parts enabled and delivered to the right stakeholders.

Consider quality in toiletry production, and specifically challenges with product loss due to variability in the quality of raw materials, as an example. It’s safe to assume that a plant will already have local control systems in place elsewhere to track the overall quality outcomes, but monitoring the raw material quality is often left to supplier-side data that may be under-used – serving as a record of supplier compliance with a standard, rather than being used to proactively trigger adjustments in key process settings to avoid losses.

In this scenario, an ideal micro-app could be focused on captured raw material data, using machine learning to provide deep analysis of how existing machines can best process the material lot and alerting supervisors and process owners to take action. Such a function might have a small number of users; it might even have integration with inventory or quality systems replacing some manual data entry. So, the software licensing and services and timelines to deliver impact can be kept small. When we consider some of the demands manufacturers now face on fronts ranging from qualifying new supplier/materials, to furthering energy and water reduction, to adopting more predictive maintenance and asset management strategies, we see a lot of potential to tackle these with focused solutions that happen to borrow from the underlying depth and breadth of MES solutions.

There are unquestionably many cases where a plant-wide solution like an MES is necessary or even preferable. We and our key technology and services partners have delivered many such “complete” systems across the country. However, it should certainly not be considered the only option for agile industrial businesses. If each factory can be thought of as a collection of work processes/functions that need to be delivered, then implementing the supporting/enabling technology as a collection of micro-apps can make sense. And when balancing risk, cost and speed to value, sometimes, moderation in plant technology deployments can provide the most bountiful benefits.

Novotek Solutions is an advanced industrial IT and automation solutions company providing world class hardware and software to a range of manufacturing, process and production sectors. To discover more, visit novotek.co.uk.

Emerson named ‘Industrial IoT Company of the Year’ for fifth time

Global technology and software company Emerson has been named the IoT Breakthrough 2023 ‘Industrial IoT Company of the Year’ for the fifth time – an honour the company also received in 2018, 2019, 2020 and 2022. This year’s award recognises the power of Emerson’s industry-leading Plantweb digital ecosystem, which now includes the AspenTech suite of plant optimisation software solutions.

Leveraging decades of innovation and expertise, Emerson delivers the broadest suite of automation technology to manufacturers across all industries. Emerson and AspenTech’s leading portfolio of sensor, edge, control and software solutions – the Plantweb digital ecosystem – enables companies to optimise the operations and performance of their plants and enterprise.

“Emerson is proud to be consistently recognised as an automation leader with a demonstrated commitment to innovating and providing leading solutions that help customers meet their business and sustainability goals in today’s dynamic markets,” said Ram Krishnan, chief operating officer of Emerson. “By integrating AspenTech into our industry-leading Plantweb digital ecosystem, we provide customers with the most comprehensive digital transformation portfolio in the industry, backed by deep automation expertise.”

 Plantweb, including the AspenTech portfolio of asset optimisation software, enables companies to ‘See, Decide, Act and Optimise’ across their operations. Through its sensing and visualisation, predictive diagnostics and monitoring, precision control and AI-powered analytics, Plantweb empowers companies to boost performance, improve safety and achieve sustainability targets through emissions reduction and greater energy efficiency.

“Emerson continues its decades-long streak of digital innovation and leadership across all automation categories, and the company’s breakthrough Plantweb digital ecosystem, optimised with AspenTech, represents a next-generation IIoT platform to help their customers optimise operations and meet business and sustainability goals,“ said James Johnson, managing director at IoT Breakthrough. “Emerson’s robust suite of sensors, software and control technologies are empowering organisations to ‘See, Decide, Act and Optimize’ like never before, and we are thrilled to congratulate the Emerson team for taking home our marquee ‘Industrial IoT Company of the Year’ award in the 7th annual IoT Breakthrough Awards programme.” 

IoT Breakthrough, which recognises excellence, creativity and success of Internet of Things (IoT) companies, technologies and products, received more than 4,000 nominations for the 2023 competition. The awards honour the world’s best companies, leaders, technologies and products in a range of IoT categories – from industrial and enterprise, to consumer and connected home. Winners are selected by a panel of senior-level professionals experienced in the IoT space, including journalists, analysts and technology executives.

For more information on Emerson’s automation solutions, please visit Emerson.com.

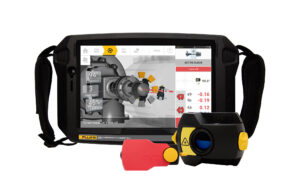
Fluke 831 Laser Shaft Alignment Tool simplifies precision shaft alignment, saving thousands in downtime and energy waste

Misalignment causes at least half of all damage to rotating machinery, but instead of fixing the problem, teams often just treat the symptoms of misalignment by replacing bearings, couplings, and seals because they think alignment takes too long. The new Fluke 831 Laser Shaft Alignment Tool makes shaft alignment easy with an intuitive guided user interface that enables quick and complete shaft alignment without advanced training or complicated programs.

While it’s easy to use, the Fluke 831 is still powerful enough for the skilled technician, letting them cover more machines with all the functionality needed on the plant floor — from thermal growth calculations to user defined tolerances and more.

The Fluke 831 features:

  • High performance and precise results — It leverages powerful features, like unique extend mode to handle gross misalignment and an integrated thermal growth calculator that automatically factors the dynamic machine changes into the result.
  • Quick setup and intuitive user interface — Its quick setup and tablet-like, intuitive guided user interface make the Fluke 831 laser alignment tool more user-friendly than any other conventional measurement method. Align coupled shafts in quick, easy steps.
  • Adaptive Alignment — Enables maintenance and reliability teams to address the full variety of horizontal, angular, and vertical alignment challenges.
  • Share data via the cloud — Its integrated WiFi cloud solution easily transfers data from the Fluke laser alignment tool to the ARC 4.0 PC software.

The Fluke 831 allows shaft alignment to become a regular part of the maintenance routine leading to less energy consumption through the elimination of reaction forces inside rotating machinery, increased reliability, reduction in costs through a decrease of spare parts and extended parts life, and increased maintenance intervals due to longer machine life.

For more information on the Fluke 831 Laser Shaft Alignment Tool, visit: https://www.fluke.com/en-us/product/mechanical-maintenance/laser-alignment/831

Silicone-overmolded system solutions directly from the connector specialist

ODU looks back on 80 years of company history and established itself early as a globally active connector specialist with currently over 2,500 employees – 1,400 of them at the headquarters in Mühldorf am Inn, Germany.

The company is known for its extensive portfolio of high-quality contacts and connectors, which are usually not usable for customers without subsequent processing. “A plug itself can only meet one part of the customer’s requirement. The connection system desired by the customer is always an interplay of ODU connector, connection technology and suitable cable,” says Rudolf Weidenspointner – Head of Product Management Cable Assembly & Technologies. In applications where, for example, high currents or temperatures act, high data rates are transmitted via copper or fiber optic cables and tightness is important, it is not enough to simply offer a high-quality connector and ignore the connection technology or cable assembly. Only in conjunction with the appropriate cable and a process-reliable connection can a connector meet the requirements of the respective customer application. If the complete solution comes from a single source, ODU can also guarantee the reliability of the cable assembly.

ODU silicone overmoldings for the medical industry

Over the past few years, the company has developed into a specialist for customer-specific overmoldings. The tools developed and manufactured by ODU for straight or angled versions are designed (depending on the application) for sample, small series or large series production.

Since applications in the medical industry must meet specific hygienic and mechanical requirements, the silicone overmolding of the contact specialist connects the ODU connector with the certified silicone cable and combines the best haptics with hygiene and resistance. The silicone overmoldings are easy to clean, flexible, insensitive to extreme temperatures and can be used even after the required autoclave cycles (steam sterilization at up to 134 °C and 3.040 mbar) neither subtract nor detach – the biocompatibility with regard to cytotoxicity testing (outgassing) according to DIN EN ISO 10993-5 is confirmed by an external test laboratory.

The complex process of silicone overmolding enables an absolutely tight but nevertheless flexible connection of the silicone cables to the connector (kink protection according to DIN EN ISO 61010-031 as well as increased strain relief) and is adapted to the specific material properties of the silicone cable.

Any quantity and length

The ODU silicone portfolio includes numerous silicone cables from qualified suppliers and includes the necessary certifications as well as further tests regarding surface finish, adhesion and cleaning, so that no further certification procedures are required by the customer. Through appropriate cooperation, ODU can always offer the cable assemblies in consistent quality (e.g. adhesion to cable jacket) and already in small quantities – availability is ensured by factory stocking. The cable assembly is available in any length (within the scope of technical possibilities), so that customers do not have to limit themselves to predefined dimensions.

Advantages of the ODU Siliconeovermolded system solutions

Customers benefit from the following advantages with the ODU silicone-overmolded system solution:

  • Certified quality of the silicone-overmolded complete solution (biocompatibility with regard to cytotoxicity testing (outgassing) according to DIN EN ISO 10993-5 and kink protection according to DIN EN ISO 61010-031)
  • Pleasant, adhesive-free feel of silicone overmolding (even for patterns or small series) without stick-slip-effect
  • Fast availability
  • Fair pricing (incl. Cost reduction vs. Individual purchase)
  • Length neutrality
  • No minimum purchase quantity
  • Reduce effort as no certification is required, the supply chain is limited to one point of contact and only one part number needs to be managed by the customer

FEEL THE DIFFERENCE – ODU offers individual, silicone-overmolded system solutions consisting of connectors, silicone overmolding and certified silicone cables with suitable assembly as well as optional laser marking in accordance with the UDI (unique device identification).

More information visit https://odu-connectors.com/technologies/silicone-overmolded-system-solutions/

The all-seeing eyes of Industry 4.0

Industry 4.0 can be described as an eye-opening experience. The next phase in the digitalisation of the manufacturing sector, driven by the astonishing rise in data volumes, computational power and connectivity, allows manufacturers to see beyond the surface of their plant to uncover new ways of optimisation. One type of sensor that acts as a manufacturer’s eyes is the optical encoder. Here, Richard Mount Director of Sales at mixed signal ASIC specialist Swindon Silicon Systems, explores the technology and its supporting ASICs.

An optical encoder is a type of motion transducer that is commonly used to measure motion and provide feedback information in a closed-loop motion control system. This information can come in the form of several parameters, including direction, position and velocity of a moving part.

There are two types of optical encoder, reflective or transmissive. Optical encoders are typically made form a light source, a high-speed optical sensor, a readhead window and either an absolute or incremental scale to diffract or reflect the light source to provide positional data. The sensor may have additional elements to guide and shape the light such as lenses and beam splitting prisms. Its operation can be initiated by sending a demand to the readhead, instructing it to capture the position on the scale at that instant. The head responds by flashing a high-power LED source to illuminate the scale.

Crucially, its timing is controlled to preserve the relationship between demanded and reported position, one of the essential features for very high specification motion systems. Once the photons are captured by the photodetector, this signal is then digitised via an analogue-to-digital converter (ADC) and sent to a powerful digital signal processor (DSP) to obtain a relatively coarse position from the code embedded in the scale. After final error checking procedures, this positional information is then available to provide highly accurate position measurement to within one nanometre.

Optical encoders can be amazingly precise, making them a desirable choice for many applications where resolution matters. Potential applications could include, for example, providing precise and reliable motion feedback in robotics applications, in CNC machines to ensure machine tools operate at appropriate speeds, in automated dispensing of products and a myriad of other specialist uses.

Data decoding

So, how exactly can the data detected from the encoder turn into actionable insights? In an optical encoder, the sensing element is likely to be a phototransistor or photodiode.  The photons from the incoming light are converted into an electrical signal, which can be conditioned and amplified. That signal is digitised with the output used for measurement data.
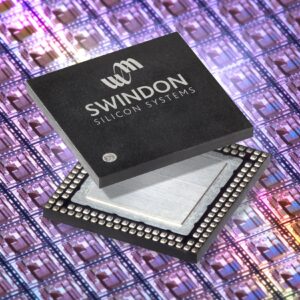
This processing unit will calculate the position from the encoder and can recognise events such as reference marks being passed, overspeed conditions and generating immediate interruptions towards the host system.

When an optical encoder is first developed, the constituent components may be commercial off-the-shelf (COTS) discrete components or integrated circuits (ICs). This can provide an adequate solution, particularly when production volumes are low. However, to truly ensure a product separates itself from the competition, it’s favourable to use ASIC technology.

ASIC technology brings many benefits. First, a reduced component count results in a smaller and more cost-effective product. Performance is enhanced with a higher speed and higher resolution encoder coupled with a lower lag. These benefits, used by a skilled ASIC design and supply company, will help a product stand out in the market.

For many customers, the protection of their Intellectual Property (IP) is extremely valuable, and ASICs provide this. Additional benefits, such as protection against obsolescence, smaller size, smaller power consumption and the knowledge that your product is unique further makes the ASIC route an attractive option for all optical encoder developers. An ASIC design partner, such as Swindon, will be able to assess a customer’s system and  provide an optimised solution, designed specifically for their application requirements.

An optical encoder may not be the literal eyes of a manufacturer, but it certainly offers a layer of vision into their operations. While precise positioning can be supported through off-the-shelf circuitry, choosing an ASIC will undoubtedly afford many opportunities for an optimised and market leading product.

Fluke Calibration launches new 5560A High-Performance Multi-Product Calibrator

Fluke, a global technology leader in the manufacture of compact, professional electronic test and measurement tools and software, has today introduced the Fluke 5560A High-Performance Multi-Product Calibrator, which provides the broadest electrical workload coverage and highest accuracy.

Satisfying demand at the high-end of the multi-product calibrator market, the 5560A sits neatly in Fluke’s product range under the high-accuracy, multi-function 5730A calibrator designed for calibrating 8.5-digit resolution DMMs. The 5560A is an ideal solution for calibrating up to 6.5-digit DMMs.

New class of multi-product calibrator

With demand for calibration growing every year, the Fluke 5560A defines a new class of multi-product calibrator by catering for new and inexperienced workers joining the calibration business without much training. Key features of the Fluke 5560A include a large 7-inch display with intuitive touchscreen for ease of use, Visual Connection Management™ terminals and an optional accessory for efficient digital multimeter (DMM) calibration with minimal or no lead changes. The rugged and portable calibrator can also be automated using MET/CAL™ Calibration Management Software.

Among the key benefits to users of the 5560A are minimal training requirements and reduced maintenance as well as the ability to calibrate a wider range of equipment using a single calibrator. These all contribute to significant reductions in cost of ownership for calibration laboratories. The 5560A is also protected against expensive damage caused by incoming voltages or overload conditions.

In its quest to offer calibration laboratories the next generation of advanced tools, Fluke Calibration has also launched the 5550A Performance Multi-Product Calibrator which enhances the highly popular multi-product 5522A to provide a better match for a customer’s existing DMM workloads. The 5550A greatly improves the accuracy delivered by the 5522A 5.5-digit DMMs as well as offering greater functionality. Featuring an intuitive graphical interface, the 5550A can calibrate the most popular handheld DMMs with increased test uncertainty ratios (TURs) and clamp meters to 1500 A with continuous current output (30 A).

Flexible calibration on-site and in the field

The 5540A Multi-Product Calibrator is another new addition to enhance Fluke Calibration’s improved range. It extends the capabilities of the 5502A with better performance levels, making it an ideal solution for on-site or mobile calibration of the most demanding field instrumentation workloads. The 5540A is perfect for calibrating handheld 4.5-digit resolution DMMs with increased TURs and clamp meters to 1500 A with continuous current output. Improvements in comparison to the 5502A include an increase from 20 A to 30 A of continuous current output and cutting waiting times during heavy usage. A wider range of thermocouple types and a new easy-connect thermocouple connector widens the temperature workload coverage of the calibrator. The 5540A can be fully calibrated with a Fluke 8588A 8.5-digit Reference Multimeter plus one shunt for the highest current range.

Wim Sibon, Fluke Calibration Technical Sales Manager for Electrical Calibration in Europe said: “In recent years, we have experienced increasing demand from laboratories for greater accuracy in their calibrators while also wanting multi-product solutions that free up bench space and keep costs down. The 5560A calibrator provides exactly what the market requires and will deliver a significant boost to the productivity of calibration laboratories around the world. This will enable our customers to cope with the demand for more accurate measurements but with a less experienced workforce.

“Fluke Calibration is committed to providing calibration laboratories with the widest workload calibration capabilities and our latest additions to the range will enable lab technicians to expand their existing workloads with confidence. The 5502A and 5522A have been the workhorses of calibration laboratories for many years and we are delighted to take their capabilities to a whole new level with the 5540A multi-product and 5550A performance multi-product calibrators. Backed by more than 50 years of continuous engineering improvements, our comprehensive range of powerful tools are the result of lifelong dedication from some of the best calibration experts in the world. At Fluke Calibration, we are passionate about measurement science.”

For more information, https://eu.flukecal.com/products/electrical-calibration/electrical-calibrators/5560a-5550a-5540a-multi-product-calibrators

You can also learn more about the 5560A in the Calibration feature of the March 2023 issue of Instrumentation.